60 Days DevOps Challenge: Day 3
Git & GitHub - Basics, Branching, Merging, PRs

Initial Tasks:
✅ Install Git on your system: Git Installation
✅ Configure your Git username and email:
git config --global user.name "Your Name"
git config --global user.email "your@email.com"
✅ Create a new folder and initialize a Git repository:
mkdir git-project && cd git-project
git init
✅ Create two files (index.html, style.css), add content, and commit:
touch index.html style.css
git add .
git commit -m "Initial commit"
✅ Modify index.html, check changes, and make another commit:
git status
git diff
git add index.html
git commit -m "Updated index.html"
✅ Check commit history using:
git log --oneline
✅ Create a GitHub Repository, add a remote, and push:
git remote add origin https://github.com/yourusername/git-project.git
git branch -M main
git push -u origin main
Challenge 1*: **Fork and clone an open-source project ([Sample Project Link](https://github.com/sd031/eks-auto-mode-workshop?utm_source=www.learnxops.com&utm_medium=referral&utm_campaign=git-github-basics-branching-merging-prs))*
Step 1: Fork the Repository
Go to the repository link:
👉 EKS Auto Mode WorkshopClick the "Fork" button (top right) to create a copy under your GitHub account
Step 2: Clone the Forked Repository
Once you've forked the repository, run:
(Replace YOUR_GITHUB_USERNAME with your actual GitHub username.)
MacBook-Pro musaveer_work % git clone https://github.com/MusaveerHolalkere25/eks-auto-mode-workshop.git
Bonus 💡 : If you want to sync future updates from the original repository, navigate into the Project Directory & Set the Upstream Repository, and run:
cd eks-auto-mode-workshop
git remote add upstream https://github.com/MusaveerHolalkere25/eks-auto-mode-workshop.git
Verify via running:
MacBook-Pro eks-auto-mode-workshop % git remote -v
origin    https://github.com/MusaveerHolalkere25/eks-auto-mode-workshop.git (fetch)
origin    https://github.com/MusaveerHolalkere25/eks-auto-mode-workshop.git (push)
upstream    https://github.com/sd031/eks-auto-mode-workshop.git (fetch)
upstream    https://github.com/sd031/eks-auto-mode-workshop.git (push)
To fetch and merge updates from the original repo:
git fetch upstream
git merge upstream/main
Challenge 2*: **Create a new branch (feature-branch), switch, and commit changes.*
Step 1: Create a New Branch and Switch to It:
git checkout -b feature-branch
Step 2: Verify the Active Branch
MacBook-Pro eks-auto-mode-workshop % git branch
* feature-branch
  main
Step 3: Make Some Changes
echo "New feature added!" > feature.txt
Step 4: Stage the Changes
git add feature.txt
Step 5: Commit the Changes
git commit -m "Added feature.txt with new feature"
Step 6: Push the New Branch to GitHub
git push origin feature-branch
Challenge 3*: **Merge feature-branch into main and push the changes.*
Step 1: Switch to the main Branch
git checkout main
Step 2: Ensure Your main Branch is Up-to-Date
git pull origin main
This fetches and merges the latest changes from the remote repository.
Step 3: Merge feature-branch into main
git merge feature-branch
If there are no conflicts, you’ll see:
eks-auto-mode-workshop % git merge feature-branch
Updating cc73895..d1fec70
Fast-forward
 feature.txt | 1 +
 1 file changed, 1 insertion(+)
 create mode 100644 feature.txt
If there are conflicts, Git will notify you, and you’ll need to manually resolve them.
Step 4: Push the Merged Changes to GitHub
git push origin main
Step 5: Delete feature-branch
After merging, you can delete the feature branch:
MacBook-Pro eks-auto-mode-workshop % git branch -d feature-branch
Deleted branch feature-branch (was d1fec70).
MacBook-Pro eks-auto-mode-workshop % git push origin --delete feature-branch
To https://github.com/MusaveerHolalkere25/eks-auto-mode-workshop.git
 - [deleted]         feature-branch
Challenge 4*: **Use git reset or git revert to undo a commit.*
Using git reset:
Completely Remove the Last Commit
git reset --hard HEAD~1
If you want to undo the commit but keep the changes:
git reset --soft HEAD~1
Using git revert to Undo a Specific Commit Without Changing History
git revert <commit-hash>
Bonus 💡 If you've already pushed the commit to GitHub and need to force-push:
git push origin main --force # Use with caution!
Challenge 5*: **Rebase feature-branch onto main and understand the difference.*
First what is exactly a Git Rebase:
git rebase is a command that moves or combines commits from one branch onto another, rewriting commit history in a linear way.
Example:
Before rebase (git log --oneline --graph):
* commit C (feature-branch)
* commit B (feature-branch)
| * commit M2 (main)
| * commit M1 (main)
|/
* commit A (common ancestor)
After rebase:
* commit C' (feature-branch, rebased)
* commit B' (feature-branch, rebased)
* commit M2 (main)
* commit M1 (main)
* commit A (common ancestor)
Now, to rebase feature-branch onto main using the following steps:
Step 1: Switch to feature-branch
git checkout feature-branch
Step 2: Rebase feature-branch onto main
git rebase main
Explanation:
This moves feature-branch to start from the latest main commit.
It applies feature-branch commits on top of main.
Step 3: Resolve Any Merge Conflicts
If conflicts occur:
Git will pause and show which files have conflicts.
Manually edit the conflicting files to resolve them.
Mark conflicts as resolved:
git add <resolved-file>Continue the rebase:
git rebase --continueIf you want to abort the rebase:
git rebase --abort
💡 Difference: Rebase vs Merge
| Feature | Rebase | Merge |
| History | Creates a clean linear history | Keeps a branching history |
| Commits | Moves commits on top of the latest main | Merges main changes with a merge commit |
| Conflicts | Can require resolving multiple conflicts | Resolves conflicts once at merge |
| Recommended When | You want a clean history (before merging) | You need a clear branch history |
Challenge 6*: **Create a PR on GitHub from a feature branch.*
Step 1: Push the Feature Branch to GitHub
If your feature branch isn't pushed yet, run:
git push origin feature-branch
Step 2: Open GitHub and Navigate to the Repository
Go to your GitHub repository.
Click on the "Compare & pull request" button (it appears after pushing the branch).
Click on the "New pull request"

Step 3: Fill in PR Details
Ensure the correct base and compare branches:
Base branch: main
Compare branch: feature-branch
Add a Title & Description (e.g., "Added new feature for user authentication").
Optional: Assign reviewers, add labels, or link issues.
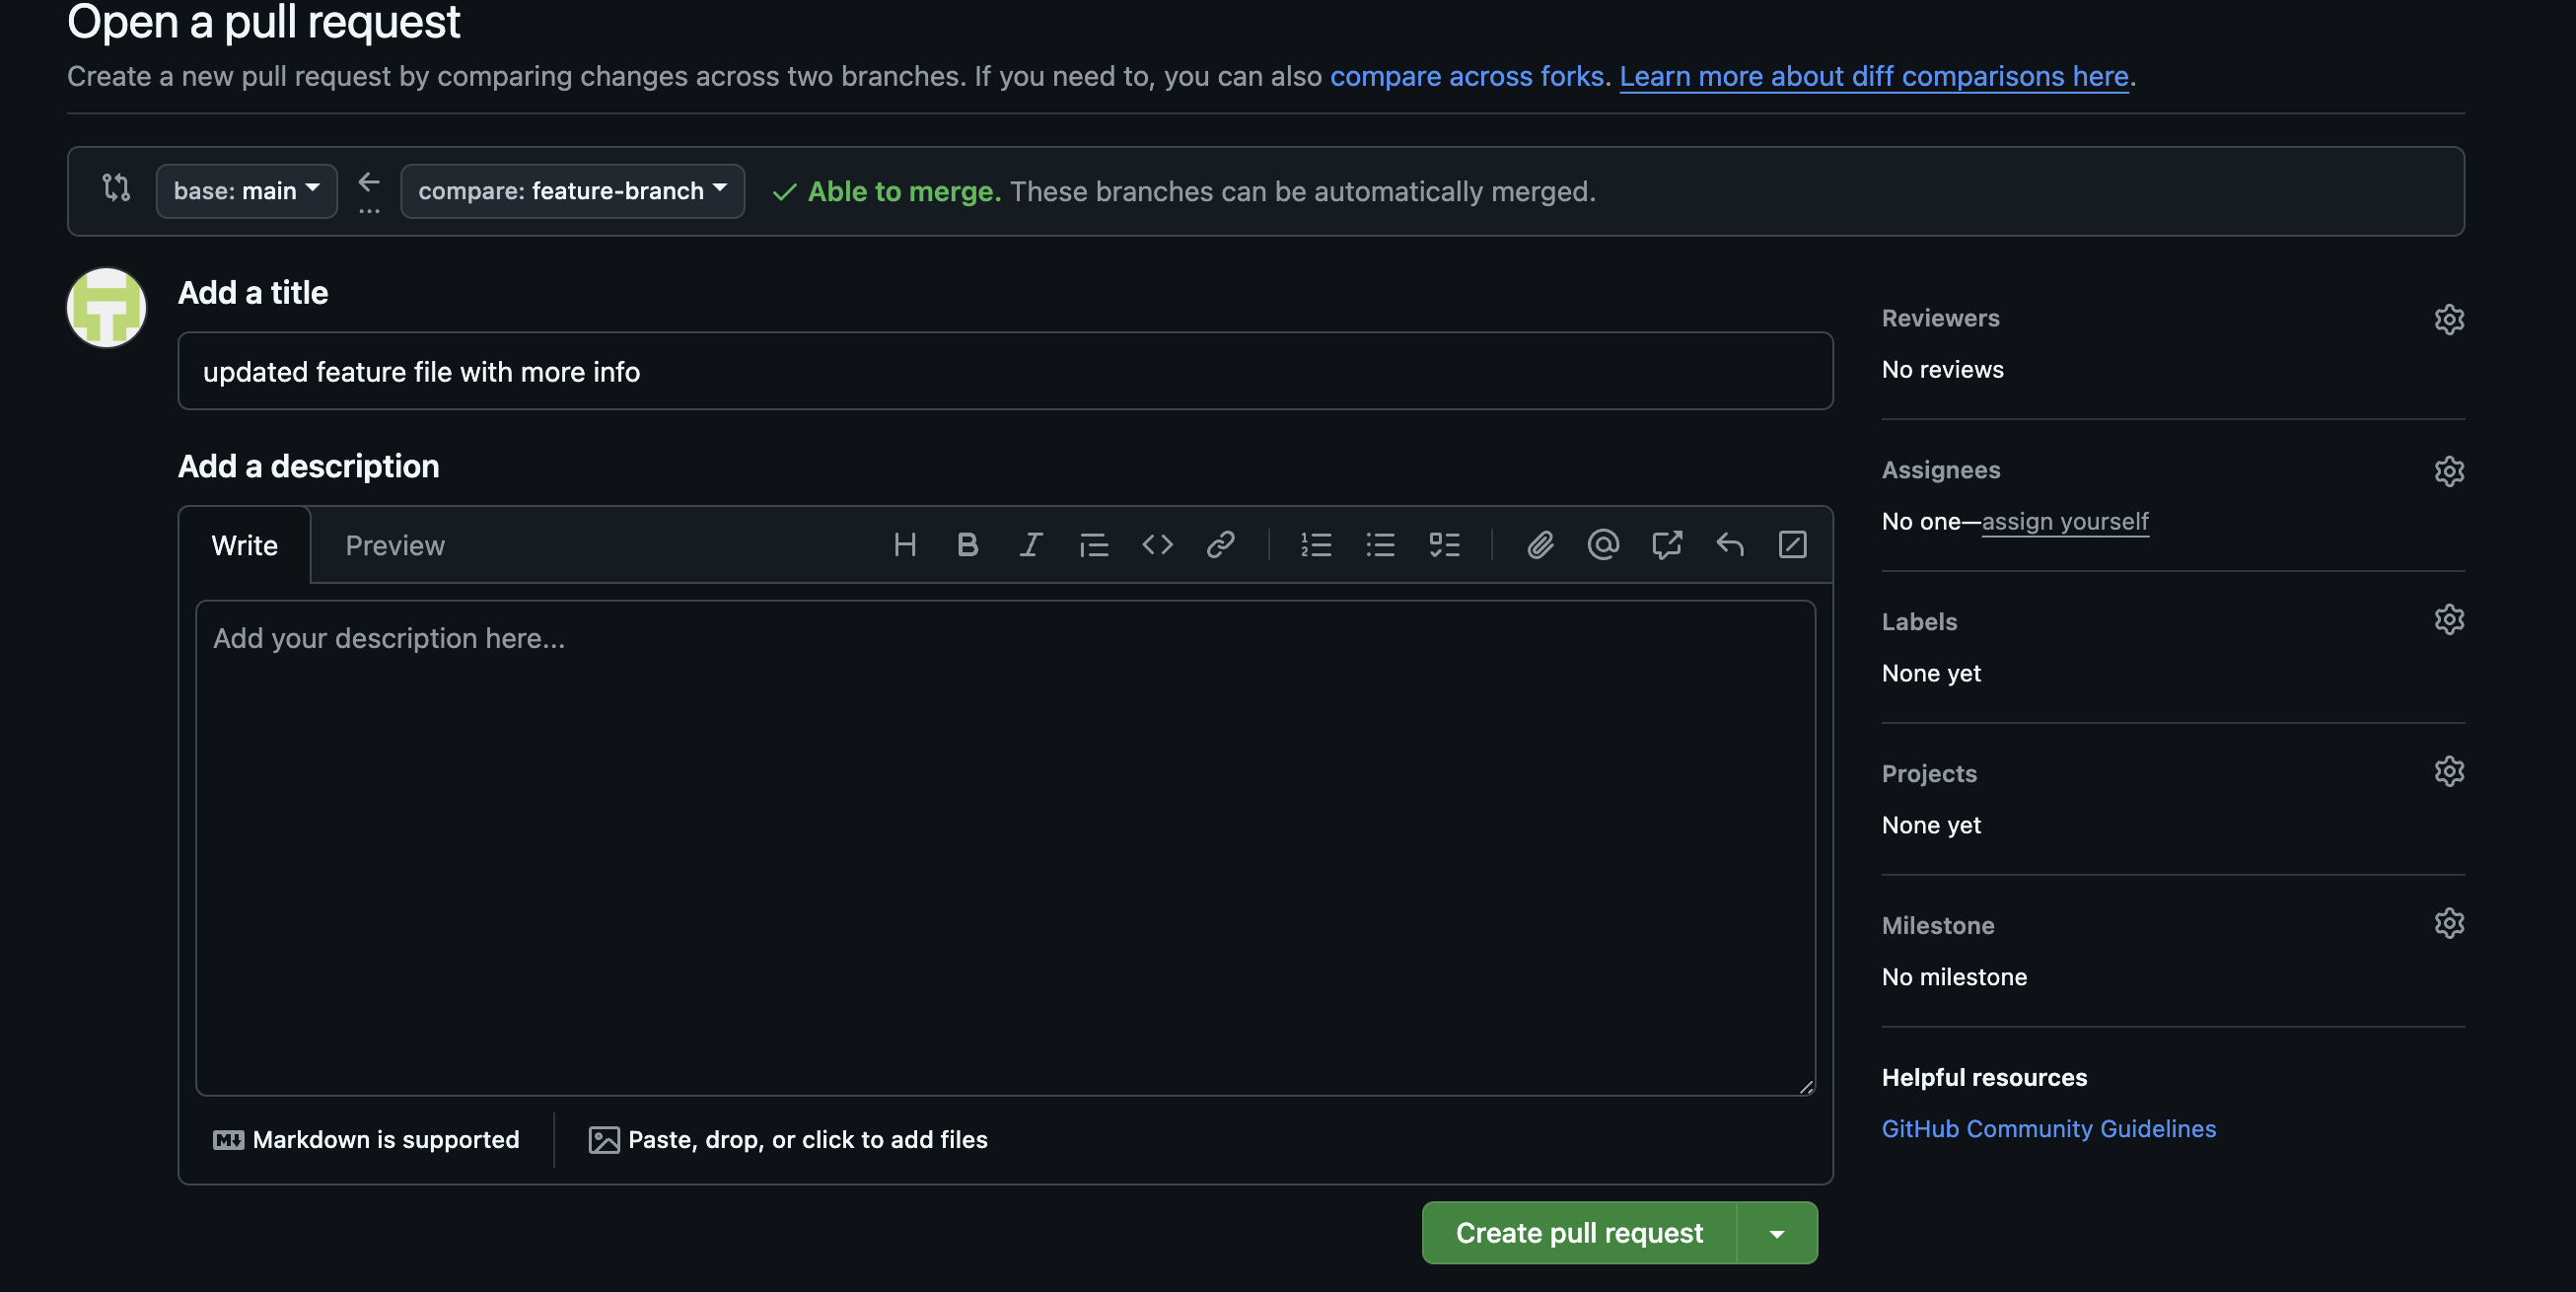
Step 4: Create the PR
Click "Create Pull Request".
Your PR is now open for review.
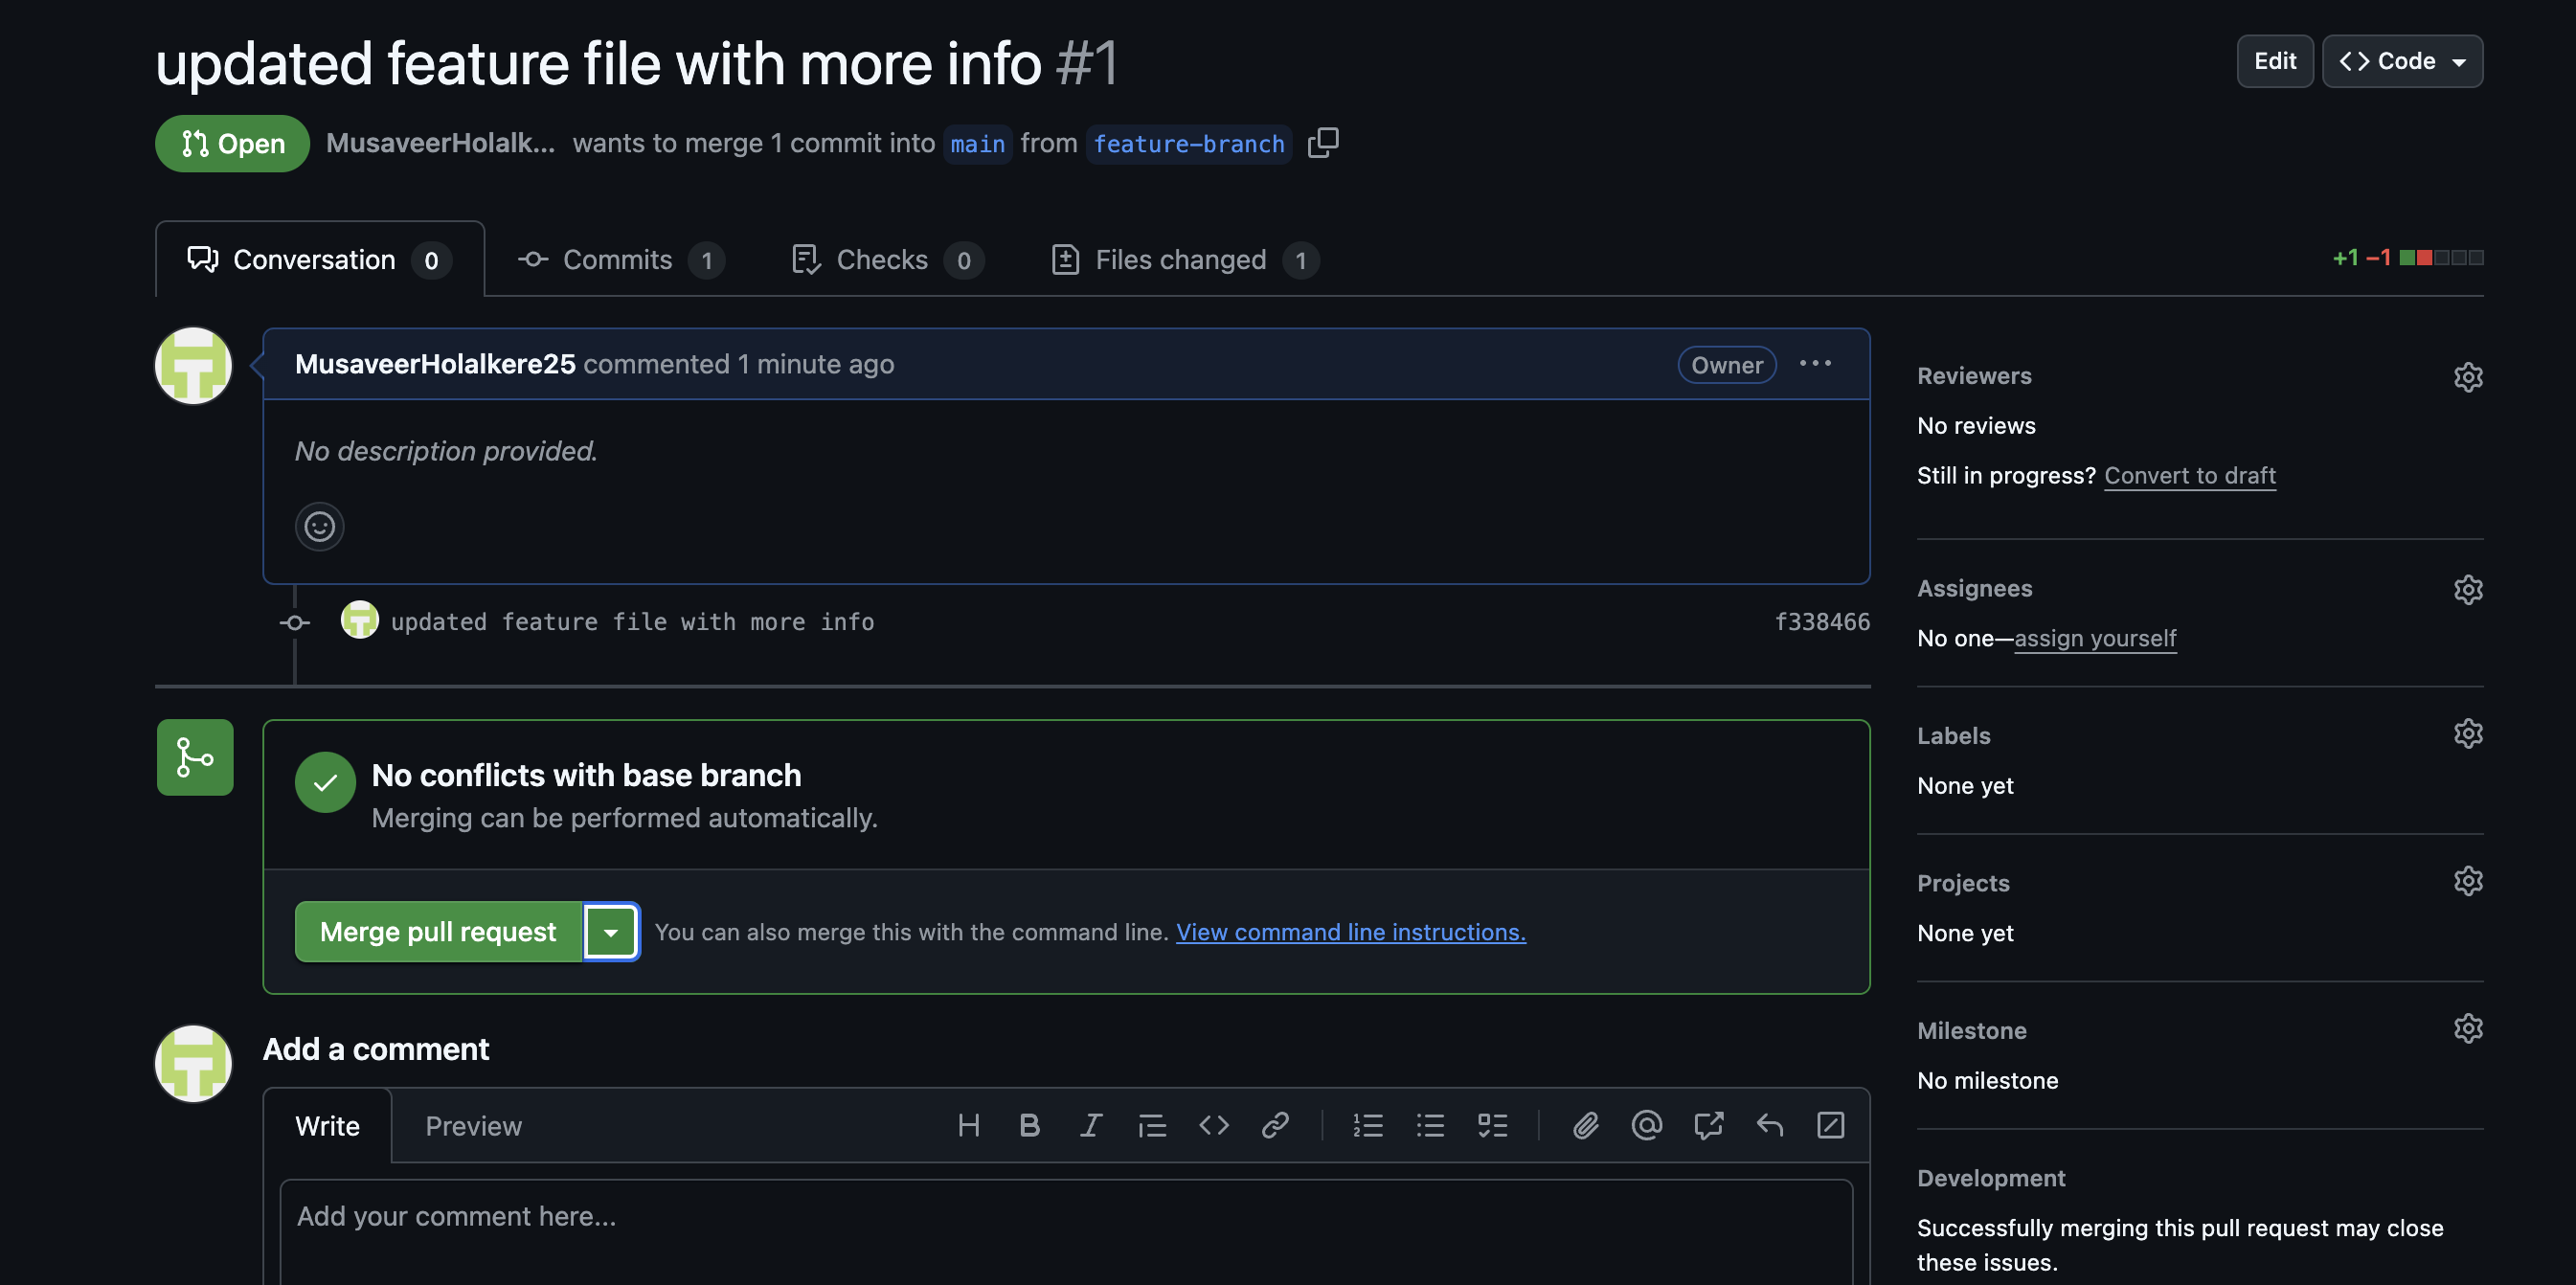
Step 5: Merge the PR (After Approval)
Once approved, merge the PR:
Click "Merge pull request".
Select "Squash and merge" (optional for a clean history).
Delete the feature branch if no longer needed.
Bonus 💡 : Create a PR Using GitHub CLI (Optional)
gh pr create --base main --head feature-branch --title "New Feature" --body "Description of the feature"
Challenge 7*: **Create conflicting changes in different branches and resolve them.*
Step 1: Create a Repository (or Use an Existing One)
If you don’t have a repository, create one:
git init conflict-demo
cd conflict-demo
echo "Hello, DevOps!" > file.txt
git add file.txt
git commit -m "Initial commit"
Step 2: Create and Modify feature-branch
git checkout -b feature-branch

echo "Feature branch change" > file.txt

git add file.txt

git commit -m "Modified file.txt in feature-branch"
Step 3: Switch to main and Make a Conflicting Change
git checkout main

echo "Main branch change" > file.txt

git add file.txt

git commit -m "Modified file.txt in main"
Now, file.txt has different content in main and feature-branch, causing a merge conflict.
Step 4: Merge feature-branch into main
git merge feature-branch
You’ll see a conflicting message like:
Auto-merging file.txt

CONFLICT (content): Merge conflict in file.txt

Automatic merge failed; fix conflicts and then commit the result.
Step 5: Resolve the Conflict
Open file.txt, which will look like this:
<<<<<<< HEAD
Main branch change

=======

Feature branch change

>>>>>>> feature-branch
Manually edit the file to keep the correct content.
Mark the conflict as resolved:
git add file.txt
git commit -m "Resolved merge conflict in file.txt"
Step 6: Push the Merged Changes
git push origin main
Challenge 8: git stash to save and restore uncommitted changes.
Step 1: Make Some Changes to a File
echo "Uncommitted changes" >> file.txt
Check the status using git status command:
git status
#Output:
Changes not staged for commit:
modified:   file.txt
Step 2: Stash Uncommitted Changes
git stash
This saves the changes and reverts your working directory to the last committed state.
Check the status again using git status the command:
git status

Nothing to commit, working tree clean.
Step 3: Restore the Stashed Changes
To restore the last stashed changes:
git stash pop
OR if you want to apply the changes but keep them in stash:
git stash apply
Step 4: List All Stashes
If you have multiple stashes:
git stash list

stash@{0}: WIP on feature-branch: 123abc Modified file.txt

stash@{1}: WIP on main: 456def Added a new feature
Step 5: Restore a Specific Stash
If you want to apply a specific stash:
git stash apply stash@{1}
Step 6: Delete a Stash
After restoring, if you no longer need the stash:
git stash drop stash@{0}
To clear all stashes:
git stash clear
Challenge 9*: **Add version tags to commits and push them.*
Step 1: Check the Latest Commit
To verify which commit you’re tagging:
git log --oneline --graph --decorate -n 5

a1b2c3d (HEAD -> main) Added feature X

e4f5g6h Fixed bug Y

i7j8k9l Initial commit
Step 2: Create a Tag
Lightweight Tag (Basic, No Message)
git tag v1.0.0Annotated Tag (With Message)
git tag -a v1.0.0 -m "Release version 1.0.0"
Step 3: List Tags
git tag

#output
v1.0.0

#To view details of an annotated tag:
git show v1.0.0
Step 4: Push the Tag to GitHub
git push origin v1.0.0
To push all tags:
git push --tags
Step 5: Delete a Tag (If Needed)
Delete a Local Tag
git tag -d v1.0.0Delete a Remote Tag
git push origin --delete v1.0.0
Bonus 💡 : Checkout a Specific Tag
To create a branch from a tag:
git checkout -b release-1.0 v1.0.0
Challenge 10*: **Use git commit --amend and git rebase -i to edit past commits.*
Step 1: Modify a Tracked File
echo "New change" >> file.txt
git add file.txt
Step 2: Amend the Last Commit
git commit --amend -m "Updated commit with new changes"
✅ This modifies the last commit instead of creating a new one.
Step 3: Push the Amended Commit (If Already Pushed)
If you already pushed the commit, force push is required:
git push origin main --force
🚨 Use with caution, as it rewrites history!
Option 2: Edit Older Commits (git rebase -i)
If you need to modify a commit that is not the last one, use interactive rebase.
Step 1: List Recent Commits
git log --oneline -n 5
Example output:
a1b2c3d (HEAD -> feature-branch) Added new feature

e4f5g6h Fixed API issue

i7j8k9l Updated documentation

m0n1o2p Initial commit
Step 2: Start an Interactive Rebase
To modify the last 3 commits:
git rebase -i HEAD~3
Step 3: Modify Commits:
The editor will show
pick a1b2c3d Added new feature
pick e4f5g6h Fixed API issue
pick i7j8k9l Updated documentation
Change pick to:
reword a1b2c3d Added new feature
edit e4f5g6h Fixed API issue
pick i7j8k9l Updated documentation
Save and close the editor.
Step 4: Edit the Selected Commits
For reword, Git will prompt you to edit the commit message.
For edit, Git will pause the rebase:
Modify the commit (if needed) :
echo "Extra fix" >> file.txtgit add file.txtgit commit --amendContinue the rebase:
git rebase --continue
Step 5: Push the Edited Commits
If you already pushed the commits, force push is required:
git push origin feature-branch --force
In conclusion, the 60 Days DevOps Challenge: Day 3 provides a comprehensive guide to mastering essential Git and GitHub skills. By completing the tasks and challenges outlined, participants gain hands-on experience in version control, branching, merging, and collaboration on open-source projects. These skills are crucial for efficient software development and collaboration in modern DevOps environments. As participants progress through the challenges, they build a solid foundation in Git operations, enabling them to manage code changes effectively and contribute to projects with confidence.